This is an application that takes AnythingLLM and a selection of abstracts
and asks a local LLM (granite ideally) if the abstract has been written by an AI and/or
is a possible sales pitch.
It gives a file called overview.csv with a confidence score of up to 100 if it’s been AI or
too “sales-y.”
You can also inject a csv into this instead of reading an API, either pretalx or sessionize for the time being.
CSV notes
Take a look at test_data/testing.csv as an example. You run it via python main.py -c CSV_FILE, check python main.py -h for help.
NOTE: This is , seporated for the time being, so you’ll need to remove all the , from the actual abstracts so it can be parsed correctly.
The sections that are needed the csv are as follows:
code
title
abstract
description
Configuration
Everything is configured in the config.toml file, copy it to
the working directory and do something like the following:
First install AnythingLLM, here, and configure it
with something along these lines of this.
Note: As of this release you will need to configure the model you want this to us via the
“default” AnythingLLM configuration. It seems for now you can’t programaticly change the workspace
for different models, so this is the work around.
Check out testing_notes.md for some of the numbers ran with other
models on the same data.
Copyright:: 2025- IBM, Inc

Licensed under the Apache License, Version 2.0 (the "License");
you may not use this file except in compliance with the License.
You may obtain a copy of the License at

http://www.apache.org/licenses/LICENSE-2.0

Unless required by applicable law or agreed to in writing, software
distributed under the License is distributed on an "AS IS" BASIS,
WITHOUT WARRANTIES OR CONDITIONS OF ANY KIND, either express or implied.
See the License for the specific language governing permissions and
limitations under the License.
BRD4001A Rev A01 SiLabs WSTK reffered as Mainboard
BRD4308A Rev A01 (MGM210P032JIA) reffered as Radio Board
Software Used
Gecko SDK v2.7.9 -> Bluetooth SDK v2.13.9.0
Simplicity Studio v4
GNU ARM GCC v7.2.1
About the Project
The project provides an example for accessing peripherals on SiLabs MGM210P032JIA module along with BLE stack running. Radio Board BRD4308A has MGM210P032JIA module. The module is based on the EFR32MG21 SoC.
Important Files
Executable binaries are in ./GNU ARM v7.2.1 - Default
The ./app.c and ./app.h contains event handler for BLE.
Files ./peripheral_utils.c and ./peripheral_utils.h contain functions that deal with peripherals on SoC.
Gatt Profile
When Testing with mobile app, you will see following list of Custom Services and Characteristics. You might not see the names mentioned below but you will see the {UUID}. This can also be seen in Visual GATT Editor by opening ./soc-peripherals-on-MGM210P032.isc
Peripheral Test {686d7b33-129f-4532-89c1-c502c6159bb3}
LED0 {abe6b815-d38c-476e-ae7e-dd1d62e209de}
Type: USER
Size: 1 byte
BUTTON1 {ebff5ca7-0398-422a-a0ea-63fefb0765ec}
Type: HEX
Size: 1 byte
ADC DATA {bb7b889f-587e-421f-a3b4-c3654998a742}
Type: USER
Size: 5 byte
UART2 Data {9b475432-881f-418a-98ca-003c65339261}
Type: HEX
Size: 80
Peripherals Used
GPIO
LED
Mainboard has 2 on board LEDs out of which LED0 is used. This LED is connected to GPIO PB0. Therefore, GPIO PB0 is set as output. Characteristic LED0 is used which accepts following values
Value
Action
0
Turn OFF LED
1
Turn ON LED
2
Toggle LED
2. BUTTON
Mainboard has 2 on board push buttons out of which Button1 is used. This Button is connected to GPIO PB1. Therefore, GPIO PB1 is set as input. Characteristic BUTTON1 is used convey number of button presses.
Every button press generates a GPIO interrupt. The ISR keeps a counter for the number of times the button was pressed and generates a signal (SW interrupt to BLE stack). This signal raises an event in BLE stack. Using this event Client is notified of the counter value everytime button is pressed.
IADC
ADC Configurations
Value
Mode
Single input
Port and Pin
PC02
Trigger Action
Once
Over Sampling Ratio
2x
CLK_ADC_FREQ
1,000,000 -> 1MHz
CLK_SRC_ADC_FREQ
1,000,000 -> 1MHz
If Trigger Action was set to Continuous, then according to formula on pg14 of AN1189: Incremental Analog to Digital Converter (IADC), the converion time would be
Conversion Time = 10/1,000,000
This means Samples per seconds = 1,000,000/10 = 100,000 = 100ksps
Since, we are using Trigger Action as Once and we are invoking IADC every second using BLE stack soft timer, the effective Samples Per Second = 1 sps
Enabling the notification will start the soft timer and also trigger IADC.
UART
UART Configuration
Value
Tx Port and Pin
PC00
Rx Port and Pin
PC01
Baud Rate
115200
Flow Control
No
Data Size
8 bit
Parity
None
The MGM210P has 3 USARTs, USART2 and been configured as asynchronous USART (i.e. UART). Since Rx can only take place in EM0 and EM1 the EM2 sleep must be blocked when MCU wants to receive the data.
Enabling notification will allow MCU to receive the data.
We believe in a future in which the web is a preferred environment for numerical computation. To help realize this future, we’ve built stdlib. stdlib is a standard library, with an emphasis on numerical and scientific computation, written in JavaScript (and C) for execution in browsers and in Node.js.
The library is fully decomposable, being architected in such a way that you can swap out and mix and match APIs and functionality to cater to your exact preferences and use cases.
When you use stdlib, you can be absolutely certain that you are using the most thorough, rigorous, well-written, studied, documented, tested, measured, and high-quality code out there.
To join us in bringing numerical computing to the web, get started by checking us out on GitHub, and please consider financially supporting stdlib. We greatly appreciate your continued support!
dispatch
Dispatch to a native add-on applying a unary function to an input strided array.
The branches.md file summarizes the available branches and displays a diagram illustrating their relationships.
To view installation and usage instructions specific to each branch build, be sure to explicitly navigate to the respective README files on each branch, as linked to above.
Returns a function which dispatches to a native add-on applying a unary function to an input strided array.
functionaddon(N,dtypeX,x,strideX,dtypeY,y,strideY){// Call into native add-on...}functionfallback(N,dtypeX,x,strideX,dtypeY,y,strideY){// Fallback JavaScript implementation...}// Create a dispatch function:varf=dispatch(addon,fallback);// ...// Invoke the dispatch function with strided array arguments:f(2,'generic',[1,2],1,'generic',[0,0],1);
The returned function has the following signature:
f( N, dtypeX, x, strideX, dtypeY, y, strideY )
where
N: number of indexed elements.
dtypeX: x data type.
x: input array.
strideX: x stride length.
dtypeY: y data type.
y: output array.
strideY: y stride length.
The addon function should have the following signature:
f( N, dtypeX, x, strideX, dtypeY, y, strideY )
where
N: number of indexed elements.
dtypeX: x data type (enumeration constant).
x: input array.
strideX: x stride length.
dtypeY: y data type (enumeration constant).
y: output array.
strideY: y stride length.
The fallback function should have the following signature:
f( N, dtypeX, x, strideX, dtypeY, y, strideY )
where
N: number of indexed elements.
dtypeX: x data type.
x: input array.
strideX: x stride length.
dtypeY: y data type.
y: output array.
strideY: y stride length.
dispatch.ndarray( addon, fallback )
Returns a function which dispatches to a native add-on applying a unary function to an input strided array using alternative indexing semantics.
functionaddon(N,dtypeX,x,strideX,dtypeY,y,strideY){// Call into native add-on...}functionfallback(N,dtypeX,x,strideX,offsetX,dtypeY,y,strideY,offsetY){// Fallback JavaScript implementation...}// Create a dispatch function:varf=dispatch.ndarray(addon,fallback);// ...// Invoke the dispatch function with strided array arguments:f(2,'generic',[1,2],1,0,'generic',[0,0],1,0);
The returned function has the following signature:
f( N, dtypeX, x, strideX, offsetX, dtypeY, y, strideY, offsetY )
where
N: number of indexed elements.
dtypeX: x data type.
x: input array.
strideX: x stride length.
offsetX: starting x index.
dtypeY: y data type.
y: output array.
strideY: y stride length.
offsetY: starting y index.
The addon function should have the following signature:
f( N, dtypeX, x, strideX, dtypeY, y, strideY )
where
N: number of indexed elements.
dtypeX: x data type (enumeration constant).
x: input array.
strideX: x stride length.
dtypeY: y data type (enumeration constant).
y: output array.
strideY: y stride length.
The fallback function should have the following signature:
f( N, dtypeX, x, strideX, offsetX, dtypeY, y, strideY, offsetY )
where
N: number of indexed elements.
dtypeX: x data type.
x: input array.
strideX: x stride length.
offsetX: starting x index.
dtypeY: y data type.
y: output array.
strideY: y stride length.
offsetY: starting y index.
Notes
To determine whether to dispatch to the addon function, the returned dispatch function checks whether the provided arrays are typed arrays. If the provided arrays are typed arrays, the dispatch function invokes the addon function; otherwise, the dispatch function invokes the fallback function.
Examples
varFloat64Array=require('@stdlib/array-float64');vardispatch=require('@stdlib/strided-base-unary-addon-dispatch');functionaddon(N,dtypeX,x,strideX,dtypeY,y,strideY){console.log(x);// => <Float64Array>[ 3, 4 ]console.log(y);// => <Float64Array>[ 7, 8 ]}functionfallback(N,dtypeX,x,strideX,offsetX,dtypeY,y,strideY,offsetY){console.log(x);// => [ 1, 2, 3, 4 ]console.log(y);// => [ 5, 6, 7, 8 ]}// Create a dispatch function:varf=dispatch.ndarray(addon,fallback);// Create strided arrays:varx=newFloat64Array([1,2,3,4]);vary=newFloat64Array([5,6,7,8]);// Dispatch to the add-on function:f(2,'float64',x,1,2,'float64',y,1,2);// Define new strided arrays:x=[1,2,3,4];y=[5,6,7,8];// Dispatch to the fallback function:f(2,'generic',x,1,2,'generic',y,1,2);
Notice
This package is part of stdlib, a standard library for JavaScript and Node.js, with an emphasis on numerical and scientific computing. The library provides a collection of robust, high performance libraries for mathematics, statistics, streams, utilities, and more.
For more information on the project, filing bug reports and feature requests, and guidance on how to develop stdlib, see the main project repository.
I actually started learning CUDA for GPGPU first, but since I do
my work with a MacBook Air (late 2012 model); I quickly realized
I couldn’t run CUDA code. My machine has an Intel HD Graphics 4000, I know, it sucks,
but still usuable! My search on how to best make use of it led me to OpenCL.
My interests with OpenCL is primarly motivated by my interests in Deep Learning.
I want a better understanding of how these frameworks are making use
of GPGPU to blaze through model training.
Here we are now, a repo of OpenCL examples. I’ll be adding more
examples here as I pickup more of OpenCL. I am thinking each example will
get a bit more complex.
Setup I am using
Mac OSX
OpenCL 1.2
C++ 11
cmake 3.7
How to Build and Run
Clone this repo and cd in this repo.
Run mkdir build && cd build
Run cmake .. && make
If everything has been correctly installed, you should be able to build
the examples with no problems. Check out the CMakeLists.txt file for info
on how the examples are being built.
Note, I already added the C++ header for OpenCL 1.x in the libs directory.
However, if you are for example working with OpenCL 2 you can create your own
header file. Head over to the KhronosGroup OpenCL-CLHPP repo
and do the following.
Run git clone https://github.com/KhronosGroup/OpenCL-CLHPP
Run cd OpenCL-CLHPP
Run python gen_cl_hpp.py -i input_cl2.hpp -o cl2.hpp
Move the generated header file cl2.hpp into the libs directory.
Profit!
Quick Introduction and OpenCL Terminology
You’re here so I don’t need to convince you that parallel computing is awesome
and the future. I don’t expect you to become an expert after you’ve gone through this repo,
but I do hope you at least get an overview of how to think in OpenCL.
OpenCL™ (Open Computing Language) is the open,
royalty-free standard for cross-platform,
parallel programming of diverse processors
found in personal computers, servers,
mobile devices and embedded platforms. – khronos site
The following are terms to know:
Platform: Vendor specific OpenCL implementation.
Host: The client code that is running on the CPU. Basically your application.
Device: The physical devices you have that support OpenCL (CPU/GPU/FPGA etc..)
Context: Devices you select to work together.
Kernel: The function that is run on the device and does the work.
Work Item: A unit of work that executes a kernel.
Work Group: A collection of work items.
Command Queue: The only way to tell a device what to do.
Buffer: A chunk of memory on the device.
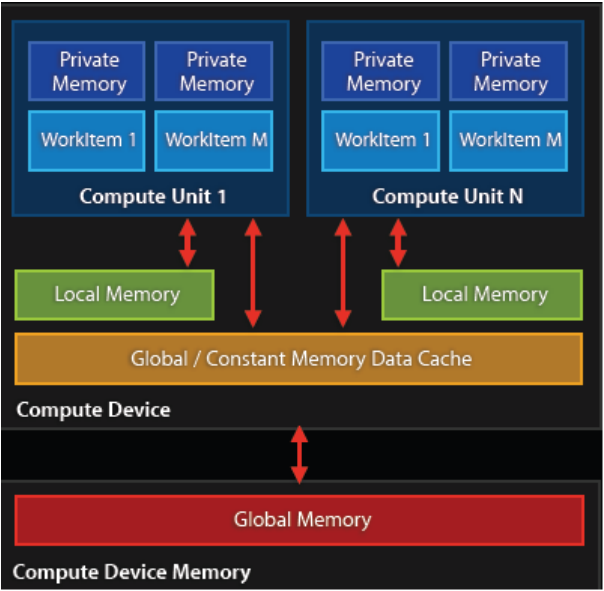
Memory: Can be global/local/private/constant (more on this later.)
Design and Implementation of an MLOps CI/CD Pipeline for a Music Recommendation System
This project demonstrates the design and implementation of a Continuous Integration and Continuous Deployment (CI/CD) pipeline for a Music Recommendation System leveraging Spotify playlists.
Key components of the pipeline include:
CI/CD Pipeline Development: Designed an automated pipeline for building, testing, and deploying the music recommendation system.
Pipeline Orchestration with Apache Airflow: Configured and managed the orchestration of the pipeline using Apache Airflow, enabling automated, scalable, and efficient workflows.
Experiment Monitoring with MLflow & DagsHub: Integrated MLflow for tracking machine learning experiments, model parameters, and performance metrics, with the MLflow server hosted on DagsHub.
Containerization with Docker: Dockerized both the recommendation application and the pipeline orchestration to ensure portability, scalability, and consistency across environments.
Unzip playlist.json.zip into the directory: mlops_msr/data/raw/ and remove the zip file afterward.
Ensure that you have the dataset file dataset.zip in mlops_air_msr/mlops_msr/data/raw/ (this is the original dataset of Spotify songs used to initialize the pipeline).
Starting the Pipeline
Once everything is set up, you can start the pipeline using Docker Compose:
docker-compose up --build
After the containers are up and running:
Music Recommender Application: Access the Flask API interface at http://localhost:5000.
Welcome to the setup guide! Here, we’ll outline the steps needed to configure and implement the various first stages of the MLOps pipeline. Follow along and fill in the details as you proceed through each step in the workflow_steps.ipynb notebook.
You can start by getting familiar with the architecture of the project:
Through this project we’ll work with a songs dataset. The goal is implement a recommendation system that will recommend a number of songs given a spotify music playlist. All while adhering to the best practices in MLOps in terms of version control, use of pipelines and the most commonly used tools.
The recommender application is a Flask API
Models training and Evaluation are monitored with MLflow with the MLflow Server in DagsHub
Configuration Files 📘
Let’s have a quick look at the three yaml files in our src folder.
You can start by having a look at the config.yaml 📂 You will see that it sets the paths to the different files that will be used and created in each of the steps we’ll put in place.
Next, inside the data_module_def folder we have the schema.yaml 🗃️ If you have a look at it you’ll see it defines the data types for each column in the dataset we’ll work with.
Finally, inside the models_module_def folder you can have a look at params.yaml 📊 What this file does is set the hyperparameters of the model we’ll put in place.
⚠️ The file src/config.py defines the global variables containing the paths to these yaml files to facilitate their access.
Common Utilities 🛠️
In src/common_utils.py we have reusable functions:
read_yaml(filepath: str) -> dict
create_directories(paths: List[str])
save_json(path: str, data: dict)
load_json
These utilities will streamline the loading of configurations and ensure necessary directories are created.
Let’ get to work!
The task
For the next steps you can use the notebook workflow_steps.ipynb to guide you through the code you’ll need to write on each of the corresponding files 🧑💻 The task consist of five steps which will help you implement a modularized workflow of an MLOps project.
Step 1: Define Configuration Classes 🧩
Start by writing the configuration objects in src/entity.py. These configurations will help in managing the settings and parameters required for each stage in a clean and organized manner. Using the Step 1 section in the notebook, define dataclasses for configuration objects:
DataIngestionConfig
DataValidationConfig
DataTransformationConfig
ModelTrainerConfig
ModelEvaluationConfig
UnsModelFitConfig
Step 2: Configuration Manager 🗄️
Create the class ConfigurationManager in src/config_manager.py using the Step 2 of the notebook. This class will:
Read paths from config.yaml.
Read hyperparameters from params.yaml.
Read the data types from schema.yaml.
Create configuration objects for each of the stages through the help of the objects defined on the step before: DataIngestionConfig, DataValidationConfig, ModelTrainerConfig and ModelEvaluationConfig.
Create necessary folders.
⚠️ Pay attention to the mlflow_uri on the get_model_evaluation_config, make sure you adapt it with your own dagshub credentials.
Step 3: Data module definition and model module definition.
Using the Step 3 section of the notebook, in the corresponding files of the src/data_module_def folder, create:
Data Ingestion module 📥
This class will:
Download the dataset into the appropriate folder.
Unzip the dataset into the appropriate folder.
Data Validation module ✅
This class will:
Validate columns against the schema. Optional: you can also verify the informatic type.
Issue a text file saying if the data is valid.
Data Transformation module 🔄
This class will:
Split the data into training and test sets.
Save the corresponding csv files into the appropriate folder.
Similarly, in the corresponding files of the src/models_module_def folder, create:
Model trainer module 🏋️♂️
This class will:
Train the model using the hyperparameters specified in params.yaml.
Save the trained model into the appropriate folder.
Model Evaluation module 📝
This class will
Evaluate the model and log metrics using MLFlow
Unsupervised Model Fit and Evaluation module 📝
This class will
Fit a clustering model for each music genre
Evaluate each fitted model and log metrics using MLFlow
Step 4: Pipeline Steps 🚀
Using the Step 4 of the notebook, in src/pipeline_steps create scripts for each stage of the pipeline to instantiate and run the processes:
stage01_data_ingestion.py
stage02_data_validation.py
stage03_data_transformation.py
stage04_model_trainer.py
stage05_model_evaluation.py
stage06_uns_model_fit_eval.py
On each script you have to complete the classes with two methods: an __init__ that doesn’t do anything, and a main where you have to implement the code in each section of the Step 4 of the notebook.
Step 5: Use DVC to connect the different stages of your pipeline 🦉
Start by setting DagsHub as your distant storage through DVC.
Add the following steps for the data transformation, data validation, model training and model evaluation.
You can run the pipeline through the command dvc repro.
Congratulations! 🎉 Now that you have a structured and well-defined MLOps project you’re ready for the next step which is the creation of the API.
Each step is modularized, making it easy to maintain, extend, and scale your Machine Learning pipeline.
Phase 2. Pipeline with Spotify data feed and Orchestration with Apache Airflow
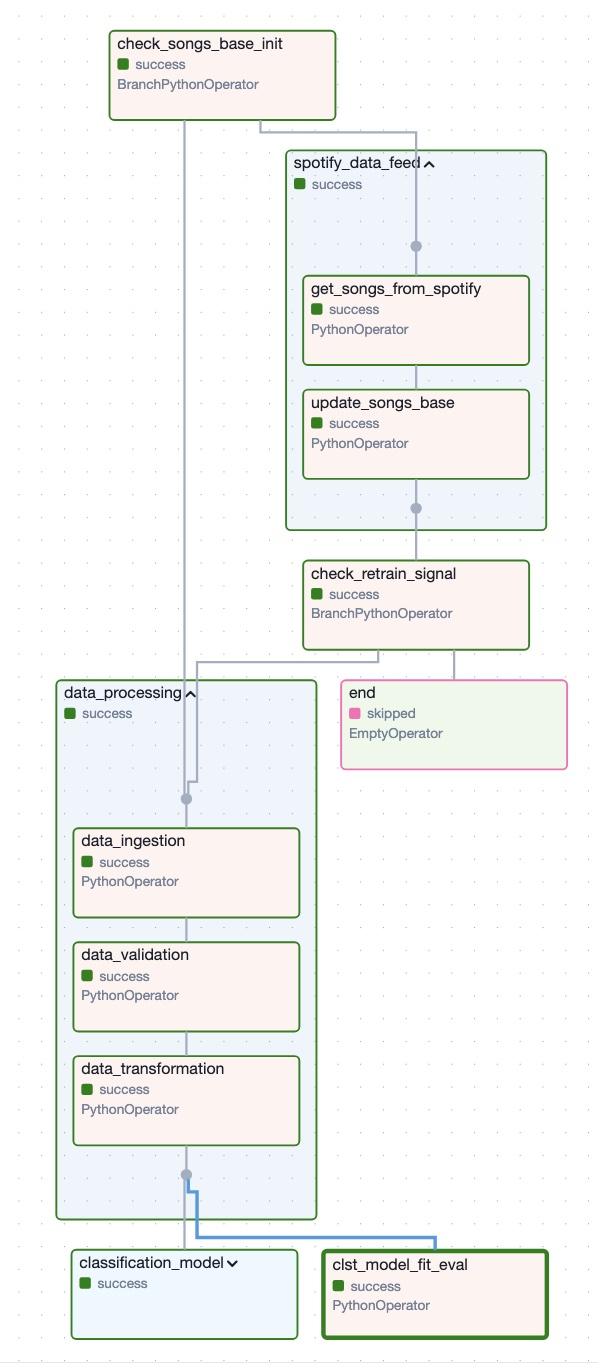
The airflow dag is defined in “dag_data_feeding.py” script
General Objective
This Python script defines a DAG in Airflow called data_feeding_dag, which orchestrates a pipeline to extract, transform, and update Spotify data. The pipeline integrates Spotify API data into a machine learning workflow. Key steps include:
Verifying and collecting Spotify data.
Updating the song database.
Processing the data.
Training and evaluating machine learning models (classification and clustering).
Key Highlights of the Script
Libraries and Configurations
Main Imports:
Airflow for task management (DAG, Operators, TaskGroups).
Spotipy for interacting with Spotify’s API.
pandas for data manipulation.
Custom modules (dag_utils) for reusable utility functions.
Global Variables:
CLIENT_ID and CLIENT_SECRET: API credentials for Spotify.
Data directories (URIS_DIR, INTERIM_DIR) for organizing processed files.
API Rate Limiting:
Implements a delay between requests to comply with Spotify’s rate limits.
Key Functions
Spotify Data Management
check_songs_base_init:
Checks if a local song database exists. If not, it triggers a data processing phase starting with the initial dataset ingestion.
get_songs_from_spotify:
Retrieves song features from Spotify’s API.
update_songs_base:
Merges newly fetched data with the existing database, removes duplicates, and archives older versions if significant changes are detected.
Pipeline Stages
data_ingestion: Loads initial data.
data_validation: Validates data against the expected schema.
data_transformation: Prepares data for machine learning models.
Model Training and Evaluation:
classification_model_training and classification_model_evaluation handle classification models.
Limits execution to one active instance at a time.
Task Structure:
Initial Branching: check_songs_base_init decides whether to collect data from spotify or initialize the songs base if it is not.
Task Groups:
spotify_data_feed: Handles song collection and database updates.
data_processing: Handles ingestion, validation, and transformation of data.
classification_model: Handles classification model training and evaluation.
Final Task: end signals the end of the DAG.
Dependencies:
The DAG organizes tasks into branches and sequences (e.g., spotify_data_feed must finish before data processing can proceed).
Summary
This Airflow DAG automates a pipeline to:
Sync Spotify data.
Update a local song database.
Prepare the data for machine learning models.
Train and evaluate these models.
It provides a flexible integration with Spotify’s API while maintaining a structured and modular workflow for managing data and models.
The recommendation application
The primary objective of this project is to create an application that recommends at least 10 songs based on a submitted Spotify playlist.
Our application is developed using the Flask framework, ensuring scalability and ease of integration.
The main codebase for the Flask application is located in mlops_msr/src/app/app.py.
Synthetic Description of app.py
Overview
This script implements a Flask web application with user authentication, admin functionalities, and a music recommendation system. The app incorporates robust security measures, user session management, and role-based access control.
Key Functionalities
1. User Authentication and Management
Registration: Users can register with a secure password validation system.
Login/Logout: Users can log in with rate-limited attempts to prevent brute force attacks.
Role Management: Admin and regular users have distinct access rights.
User Storage: User data is stored in a TinyDB database (users.json).
2. Admin-Specific Features
Parameter Update: Admins can update model parameters (e.g., GradientBoostingClassifier and GaussianMixture) stored in a YAML file.
Model Retraining: Admins can trigger model retraining through a button.
Monitoring: Admins can view a cosine similarity trend via a Plotly-generated graph.
User Deletion: Admins can remove users from the database.
3. Music Recommendation
Utilizes the predict_song function to recommend songs based on a reference playlist and a machine learning pipeline.
Rate-limited to ensure fair usage (5 recommendations/minute).
4. Security Measures
Password Validation: Ensures secure passwords with length, uppercase, digit, and special character requirements.
Rate Limiting: Limits global app requests and specific actions (e.g., login, recommendations) to mitigate abuse.
Session Configuration: Implements secure cookie settings and a session timeout.
5. Routes
/register & /login: Handle user registration and login with validation.
/logout: Logs out the current user.
/welcome: Displays a logged-in user’s welcome page.
/recommend: Processes song recommendations for logged-in users.
/update_params: Allows admins to update ML parameters.
/train: Triggers model retraining.
/monitoring: Displays a trend graph for monitoring recommendation system performance.
/delete_user: Provides admin functionality to delete a user.
The application is designed to provide a secure and feature-rich platform for music recommendations with customizable ML parameters, robust user authentication, and monitoring capabilities.
NOTE: The ones with * after the links are ones that are vetted. If you use your uc email and tell them your a cyber student, they wil mostly likely give you access.
commercetools-pino-middleware is a library that provides a seamless integration of Pino logger with the commercetools SDK. It allows you to easily log SDK requests, responses, and other relevant information with Pino, a fast and minimalist Node.js logger. The middleware is designed to be flexible and can be set up with either an auto-generated Pino instance or a custom Pino logger with specific configurations.
If you prefer a hassle-free setup, you can let the middleware create and configure the Pino instance for you. Simply pass an empty object when setting up the middleware:
import{createPinoMiddleware}from'@composable-software/commercetools-pino-middleware';import{ClientBuilder}from'@commercetools/sdk-client-v2';/** * Middleware with automatic Pino factory */constclient=newClientBuilder().withMiddleware(createPinoMiddleware({})).build();
In this method, the middleware will handle the instantiation and configuration of the Pino logger automatically.
2. Using a Custom Pino Instance
If you need a more customized Pino logger, you can pass your own Pino instance through options:
importpinofrom'pino';import{createPinoMiddleware}from'@composable-software/commercetools-pino-middleware';import{ClientBuilder}from'@commercetools/sdk-client-v2';/** * Custom Pino logger instance that can be passed to the middleware */constlogger=pino({name: 'custom-logger',level: 'info',});constoptions={logger: logger,};constclient=newClientBuilder().withMiddleware(createPinoMiddleware(options)).build();
In this case, the middleware will use the provided Pino instance to log the information, allowing you to have full control over the logger’s configuration.
Logging Details
The commercetools-pino-middleware logs essential details related to SDK requests and responses, including:
Request method and URL
Request headers
Request body (if applicable)
Response status code
Response headers
Response body (if applicable)
All logs are output in a structured JSON format, which makes it easy to parse and analyze the logged data.
Examples
Here are some examples of how the middleware logs different scenarios:
{"level":"error","time":1678376463922,"msg":"Request failed","method":"GET","url":"https://api.commercetools.com/products/xyz789","headers":{"Authorization":"Bearer <access_token>"}}
{"level":"error","time":1678376473923,"msg":"Response received with error","status":404,"headers":{"x-request-id":"xyz789"},"body":{"statusCode":404,"message":"Not Found"}}
Contributing
We welcome contributions from the community! If you encounter any issues or have suggestions for improvements, please feel free to open an issue or submit a pull request on our GitHub repository.
License
This library is licensed under the MIT License. See the LICENSE file for more details.