Blog

  • types

    Code-generated and Auto-published Telegram Bot API types

    Bot API npm npm downloads JSR JSR Score

    Versioning

    9.0.x types are for 9.0 Telegram Bot API

    Usage as an NPM package

    import type { APIMethods, APIMethodReturn } from "@gramio/types";
    
    type SendMessageReturn = Awaited<ReturnType<APIMethods["sendMessage"]>>;
    //   ^? type SendMessageReturn = TelegramMessage
    
    type GetMeReturn = APIMethodReturn<"getMe">;
    //   ^? type GetMeReturn = TelegramUser

    Please see API Types References

    Auto-update package

    This library is updated automatically to the latest version of the Telegram Bot API in case of changes thanks to CI CD! If the github action failed, there are no changes in the Bot API

    Imports (after @gramio/)

    • index – exports everything in the section
    • methods – exports APIMethods which describes the api functions
    • objects – exports objects with the Telegram prefix (for example Update)
    • params – exports params that are used in methods with Params postfix

    Write you own type-safe Telegram Bot API wrapper

    import type {
        APIMethods,
        APIMethodParams,
        TelegramAPIResponse,
    } from "@gramio/types";
    
    const TBA_BASE_URL = "https://api.telegram.org/bot";
    const TOKEN = "";
    
    const api = new Proxy({} as APIMethods, {
        get:
            <T extends keyof APIMethods>(_target: APIMethods, method: T) =>
            async (params: APIMethodParams<T>) => {
                const response = await fetch(`${TBA_BASE_URL}${TOKEN}/${method}`, {
                    method: "POST",
                    headers: {
                        "Content-Type": "application/json",
                    },
                    body: JSON.stringify(params),
                });
    
                const data = (await response.json()) as TelegramAPIResponse;
                if (!data.ok) throw new Error(`Some error occurred in ${method}`);
    
                return data.result;
            },
    });
    
    api.sendMessage({
        chat_id: 1,
        text: "message",
    });
    import { Keyboard } from "@gramio/keyboards";
    
    // the code from the example above
    
    api.sendMessage({
        chat_id: 1,
        text: "message with keyboard",
        reply_markup: new Keyboard().text("button text"),
    });

    With File uploading support

    Documentation

    Generate types manually

    Prerequire – rust

    1. Clone this repo and open it
    git clone https://github.com/gramiojs/types.git
    1. Clone repo with Telegram Bot API schema generator
    git clone https://github.com/ark0f/tg-bot-api.git
    1. Run the JSON schema generator in the cloned folder
    cd tg-bot-api && cargo run --package gh-pages-generator --bin gh-pages-generator -- dev && cd ..
    1. Run types code-generation from the root of the project
    bun generate

    or, if you don’t use bun, use tsx

    npx tsx src/index.ts
    1. Profit! Check out the types of Telegram Bot API in out folder!
    Visit original content creator repository https://github.com/gramiojs/types
  • redcap-em-survey-ui-tweaks

    Survey UI Tweaks

    This module provides end users with the ability to apply certain survey tweaks either globally to all surveys in the project or on a survey-by-survey basis.

    Tweaks Included:

    1. Remove Excess TD: When you don’t want to waste the left 1″ of the survey, you can turn off ‘auto-numbering’ of survey questions and enable this tweak.

    2. Hide Submit Button: In some cases you want a survey to be a ‘dead-end’. Perhaps to display read-only information or to stop an auto-continue chain. With this tweak you can remove the Submit button from the page.

    3. Hide Queue Corner: Sometimes you use the survey queue but do not want the button in the upper-right corner to appear on each survey.

    4. Hide Font Resize: Sometimes you don’t want users to see the +/- font resize options

    5. AutoScroll: Autoscroll is a nifty little add-on that moves the next question to the top of the window after completing any radio/dropdown question. It is great for mobile surveys where the user doesn’t have to scroll with their thumb. Also, it supports a client-side cookie to remember if a user wants to deactivate the autoscroll feature.

    6. Rename Submit Button: In some cases, you want to rename the submit button on a survey. Perhaps to, “Next Section” instead? This allows you to do just that.

    7. Hide End Queue: At the end of a survey where the survey queue is enabled, you can HIDE the summary table that shows where someone is on the queue.

    8. Hide Reset Button: In some cases you want to hide the ‘reset link’ for radio questions.

    9. Rename “Next Page >>” and “<< Previous Page” Buttons”: You may want to change the language on these buttons when breaking up a survey by section.

    10. Hide required field text: De-clutter your page on surveys with many required fields.

    11. Save and Return without email: Remove the option to send a return link to the user’s email. Users must save the url themselves.

    12. Survey Login on Save You can use this feature to prevent users from having to perform a survey-login during
      the initial data entry. To use, have a non-login survey where they enter their ‘code’. Set this survey as the
      EM option. Then, when it is saved, it will automatically make the cookies as though the user just logged in.

    13. Survey Duration Fields: Designate text fields for capture of the cumulative duration that a survey respondent spends on the survey page where the field is located. Fields can be designated either via the project module configuration dialog or by specifing the action tag @SURVEY-DURATION in Field Annotations.

    14. Change the amount of screen space a survey takes up: You may want your survey to appear slightly wider

    What’s next? Up to you. Post an issue as a request on the github site or fork and make a pull request on your own.

    Versions:

    • 0.1.0: Initial Development Version
    • 0.2.0: Added global function
    • 1.0.0: Initial repo release
    • 1.0.1: Changed class so as not to have array constants
    • 1.1.5: Fixed matrix ranking bug
    • 1.2.0: Fixed renaming of buttons bug (REDCap 12+), form level renaming of buttons now takes priority over global renaming

    Notes:
    As of version 1.2.0, instrument level configuration will take priority over global configurations

    Visit original content creator repository
    https://github.com/susom/redcap-em-survey-ui-tweaks

  • bluerov2_gym

    BlueROV2 Gymnasium Environment

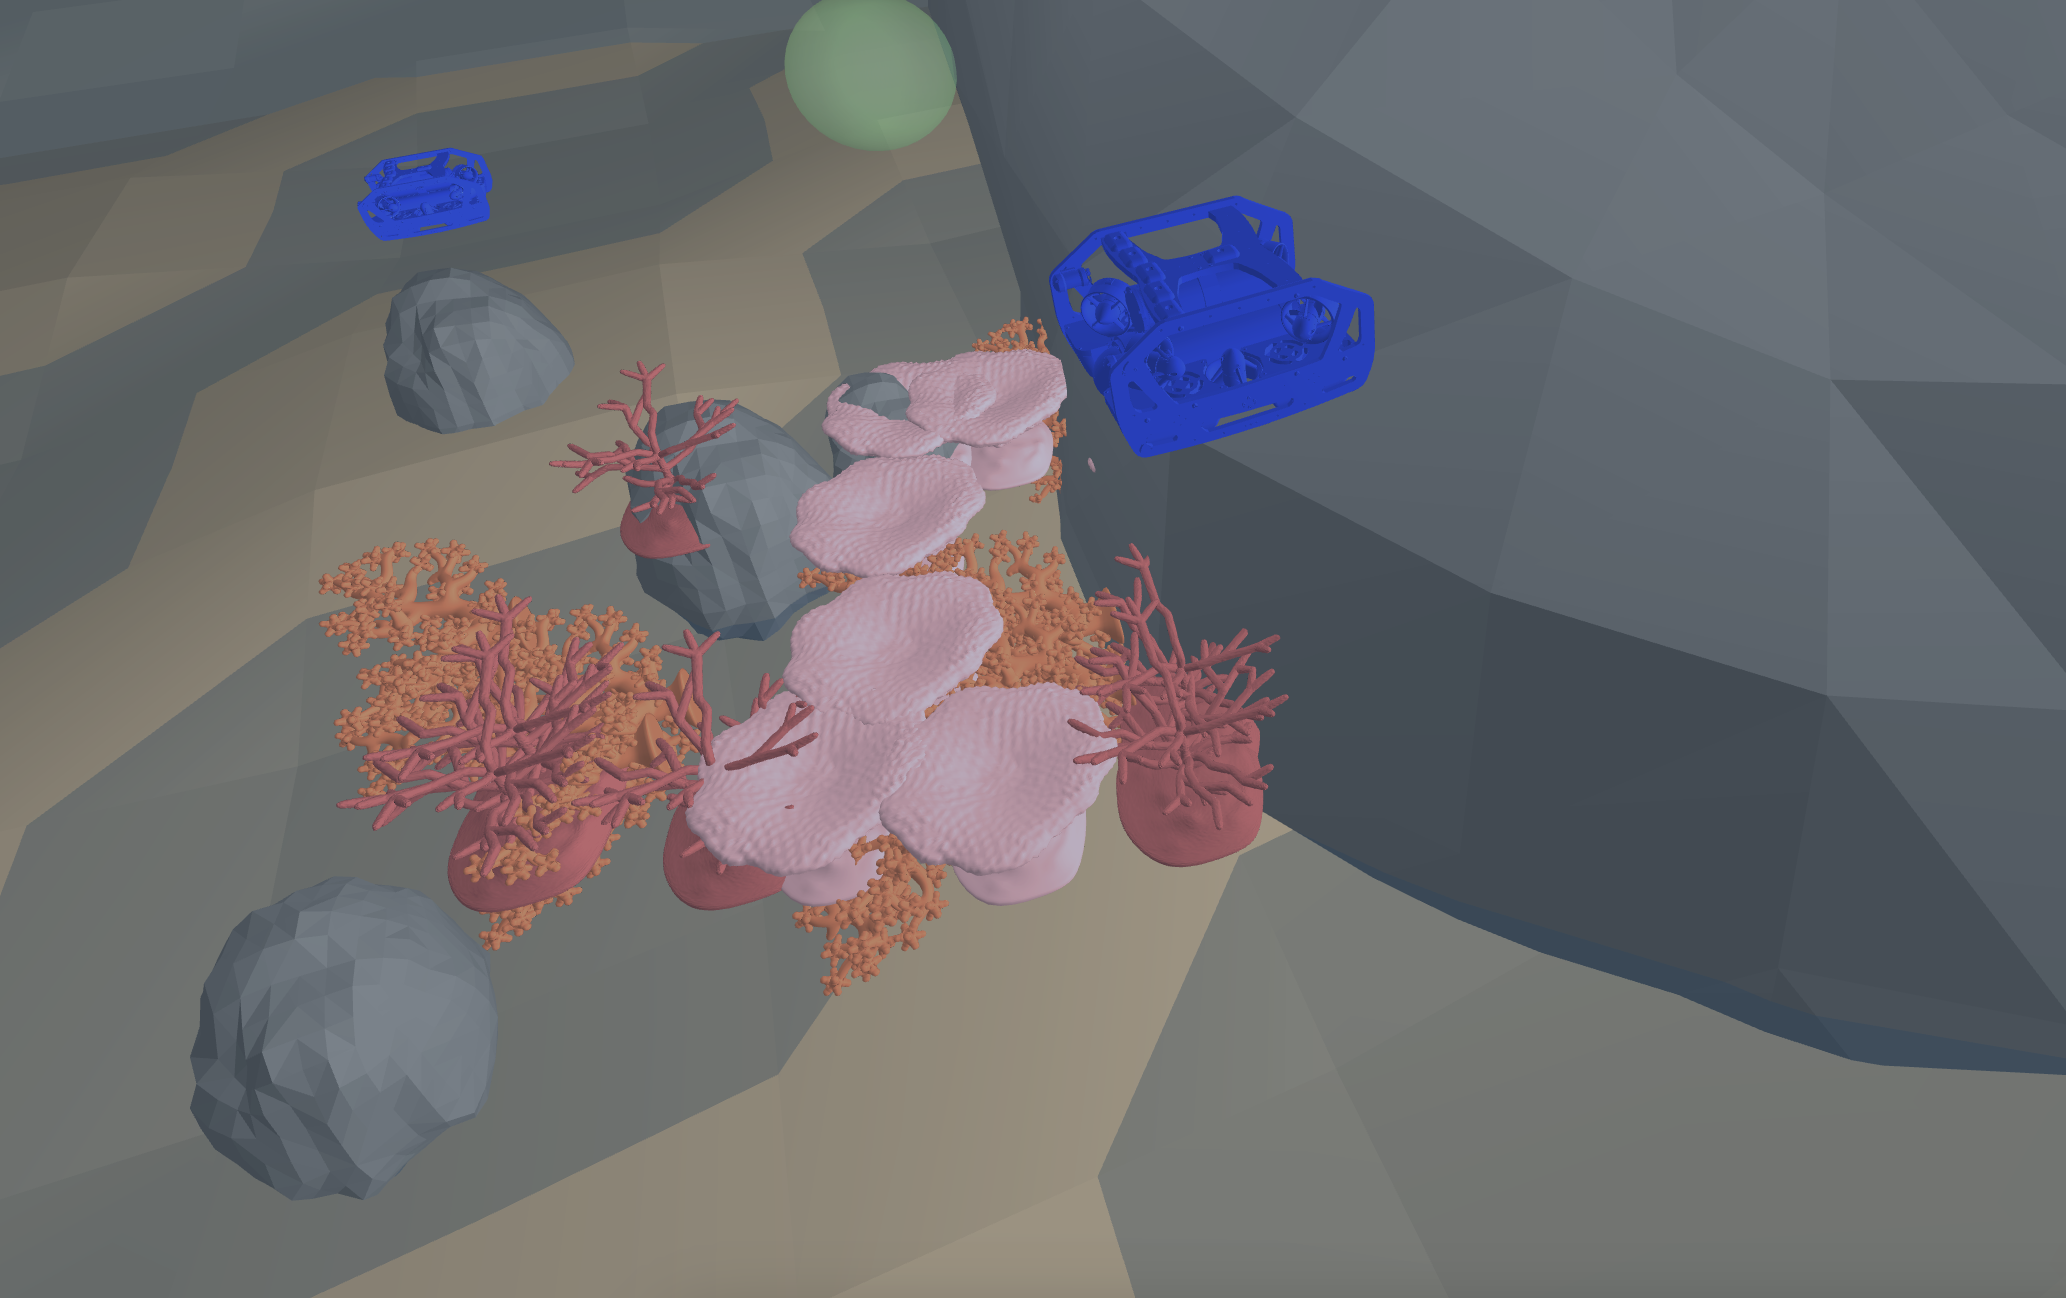
    A Gymnasium environment for simulating and training reinforcement learning agents on the BlueROV2 underwater vehicle. This environment provides a realistic simulation of the BlueROV2’s dynamics and supports various control tasks.

    image

    🌊 Features

    • Realistic Physics: Implements validated hydrodynamic model of the BlueROV2
    • 3D Visualization: Real-time 3D rendering using Meshcat
    • Custom Rewards: Configurable reward functions for different tasks
    • Disturbance Modeling: Includes environmental disturbances for realistic underwater conditions
    • Stable-Baselines3 Compatible: Ready to use with popular RL frameworks
    • Customizable Environment: Easy to modify for different underwater tasks
    • (Future release: spawn multiple AUVs)

    🛠️ Installation

    Prerequisites

    • Python ≥3.10
    • uv (recommended) or pip

    Using uv (Recommended)

    # Clone the repository
    git clone https://github.com/gokulp01/bluerov2_gym.git
    cd bluerov2_gym
    
    # Create and activate a virtual environment
    uv venv
    source .venv/bin/activate  # On Windows: .venv\Scripts\activate
    
    # Install the package
    uv pip install -e .

    Using pip

    # Clone the repository
    git clone https://github.com/gokulp01/bluerov2_gym.git
    cd bluerov2_gym
    
    # Create and activate a virtual environment
    python -m venv .venv
    source .venv/bin/activate  # On Windows: .venv\Scripts\activate
    
    # Install the package
    pip install -e .

    🎮 Usage

    Basic Usage

    import gymnasium as gym
    import bluerov2_gym
    
    # Create the environment
    env = gym.make("BlueRov-v0", render_mode="human")
    
    # Reset the environment
    observation, info = env.reset()
    
    # Run a simple control loop
    while True:
        # Take a random action
        action = env.action_space.sample()
        observation, reward, terminated, truncated, info = env.step(action)
        
        if terminated or truncated:
            observation, info = env.reset()

    Training with Stable-Baselines3 (refer to examples/train.py for full code example)

    from stable_baselines3 import PPO
    from stable_baselines3.common.vec_env import DummyVecEnv, VecNormalize
    
    # Create and wrap the environment
    env = gym.make("BlueRov-v0")
    env = DummyVecEnv([lambda: env])
    env = VecNormalize(env)
    
    # Initialize the agent
    model = PPO("MultiInputPolicy", env, verbose=1)
    
    # Train the agent
    model.learn(total_timesteps=1_000_000)
    
    # Save the trained model
    model.save("bluerov_ppo")

    🎯 Environment Details

    State Space

    The environment uses a Dictionary observation space containing:

    • x, y, z: Position coordinates
    • theta: Yaw angle
    • vx, vy, vz: Linear velocities
    • omega: Angular velocity

    Action Space

    Continuous action space with 4 dimensions:

    • Forward/Backward thrust
    • Left/Right thrust
    • Up/Down thrust
    • Yaw rotation

    Reward Function

    The default reward function considers:

    • Position error from target
    • Velocity penalties
    • Orientation error
    • Custom rewards can be implemented by extending the Reward class

    📊 Examples

    The examples directory contains several scripts demonstrating different uses:

    • test.py: Basic environment testing with manual control and evaluation with trained model
    • train.py: Training script using PPO

    Running Examples

    # Test environment with manual control
    python examples/test.py
    
    # Train an agent
    python examples/train.py

    🖼️ Visualization

    The environment uses Meshcat for 3D visualization. When running with render_mode="human", a web browser window will open automatically showing the simulation. The visualization includes:

    • Water surface effects
    • Underwater environment
    • ROV model
    • Ocean floor with decorative elements (I am no good at this)

    📚 Project Structure

    bluerov2_gym/
    ├── bluerov2_gym/              # Main package directory
    │   ├── assets/               # 3D models and resources
    │   └── envs/                 # Environment implementation
    │       ├── core/            # Core components
    │       │   ├── dynamics.py  # Physics simulation
    │       │   ├── rewards.py   # Reward functions
    │       │   ├── state.py     # State management
    │       │   └── visualization/
    │       │       └── renderer.py  # 3D visualization
    │       └── bluerov_env.py    # Main environment class
    ├── examples/                  # Example scripts
    ├── tests/                    # Test cases
    └── README.md
    

    🔧 Configuration

    The environment can be configured through various parameters:

    • Physics parameters in dynamics.py
    • Reward weights in rewards.py
    • Visualization settings in renderer.py

    📝 Citation

    If you use this environment in your research, please cite:

    @article{puthumanaillam2024tabfieldsmaximumentropyframework,
    title={TAB-Fields: A Maximum Entropy Framework for Mission-Aware Adversarial Planning},
    author={Gokul Puthumanaillam and Jae Hyuk Song and Nurzhan Yesmagambet and Shinkyu Park and Melkior Ornik},
    year={2024},
    eprint={2412.02570},
    archivePrefix={arXiv},
    url={https://arxiv.org/abs/2412.02570} } 
    }

    🤝 Contributing

    Contributions are welcome! Please feel free to submit a Pull Request. For major changes, please open an issue first to discuss what you would like to change.

    1. Fork the repository
    2. Create your feature branch (git checkout -b feature/AmazingFeature)
    3. Commit your changes (git commit -m 'Add some AmazingFeature')
    4. Push to the branch (git push origin feature/AmazingFeature)
    5. Open a Pull Request

    📄 License

    This project is licensed under the MIT License

    🙏 Acknowledgements

    • BlueRobotics for the BlueROV2 specifications
    • OpenAI/Farama Foundation for the Gymnasium framework
    • Meshcat for the visualization library

    📧 Contact

    Gokul Puthumanaillam – @gokulp01 – [gokulp2@illinois.edu]

    Project Link: https://github.com/gokulp01/bluerov2_gym

    Visit original content creator repository https://github.com/gokulp01/bluerov2_gym
  • StrixCartoon

    Welcome to Strix Cartoon 👋

    Version Documentation License: MIT Twitter: ScriptsEngineer

    Strix Cartoon – package that adds several post processing effects that can save you the time to add that final charm to your game. For fun!

    Example Left standard Unity light, right light with toon strix

    Install

    To install, you must open in the folders of your Packages/manifest.json files add the package

    “br.com.expressobits.strixcartoon”: “https://github.com/ExpressoBits/StrixCartoon.git” Or use “Add package from git URL” in package manager.

    and you’re done!

    Usage

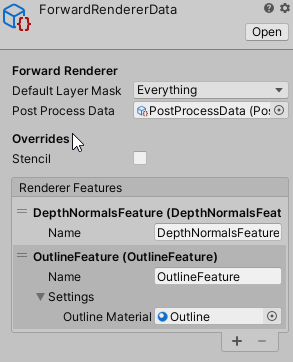
    To use the Outline, you must add Features to your ForwardRenderer.

    Outline

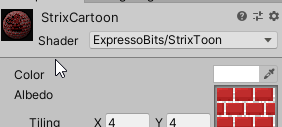
    To use Strix Toon simply use the shader on your material.

    StrixToon

    Authors


    NOTE: These shaders are a compilation of the best shaders for maximum URP compatibility with outline and lights with Toon Ramp, they are extremely based on the shaders of:

    👤 Alexander Ameye


    👤 Rafael Correa (Script)

    👤 Gabriel Correa (Textures)

    🤝 Contributing

    Contributions, issues and feature requests are welcome!

    Feel free to check issues page.

    Show your support

    Give a ⭐️ if this project helped you!

    📝 License

    Copyright © 2019 Rafael Correa.

    This project is MIT licensed.


    This README was generated with ❤️ by readme-md-generator

    Visit original content creator repository https://github.com/expressobits/StrixCartoon
  • MyBeautifulSeedbox

    My Beautiful Seedbox

    Disclamer

    Please be aware that it is essential to abide by the law regarding downloading and streaming of content. Any illegal use of movies and tv shows is strictly prohibited.

    Apps

    Apps External Access Local Docker image Tag Description
    Plex plex.yourdomain.com plex:32400 plexinc/plex latest Media Streaming
    Emby emby.yourdomain.com emby:8096 linuxserver/emby latest Media Streaming
    Flaresolverr / flaresolverr:8191 ghcr.io/flaresolverr/flaresolverr latest Proxy server to bypass Cloudflare and DDoS-GUARD protection
    Tautulli tautulli.yourdomain.com tautulli:8181 linuxserver/tautulli latest Monitor & Analyse Plex for Overseerr
    Deluge deluge.yourdomain.com deluge:8112 linuxserver/deluge latest BitTorrent client
    Sonarr / sonarr:8989 linuxserver/sonarr latest TV Shows monitor
    Radarr / radarr:7878 linuxserver/radarr latest Movies monitor
    Overseerr overseerr.yourdomain.com overseerr:5058 sctx/overseerr latest Application for managing requests for your media library
    Ombi ombi.yourdomain.com ombi:3579 linuxserver/ombi latest Application for managing requests for your media library
    Jackett / jackett:9117 linuxserver/jackett latest Tracker indexer
    Netdata netdata.yourdomain.com netdata:19999 netdata/netdata latest Metrics
    Traefik traefik.yourdomain.com traefik:(80,443,8080) traefik latest Traefik reverse proxy (access to admin dashboard)
    Joal / joal:1234 joal latest Keep your ratio
    Uptime Kuma uptime-kuma.yourdomain.com uptime-kuma:3001 Uptime Kuma latest Self-hosted monitoring tool
    Watchtower / / Watchtower latest Keep your docker image updated
    Wireguard wireguard.yourdomain.com wg-easy:51820 Wireguard latest The easiest way to run WireGuard VPN + Web-based Admin UI.

    Description

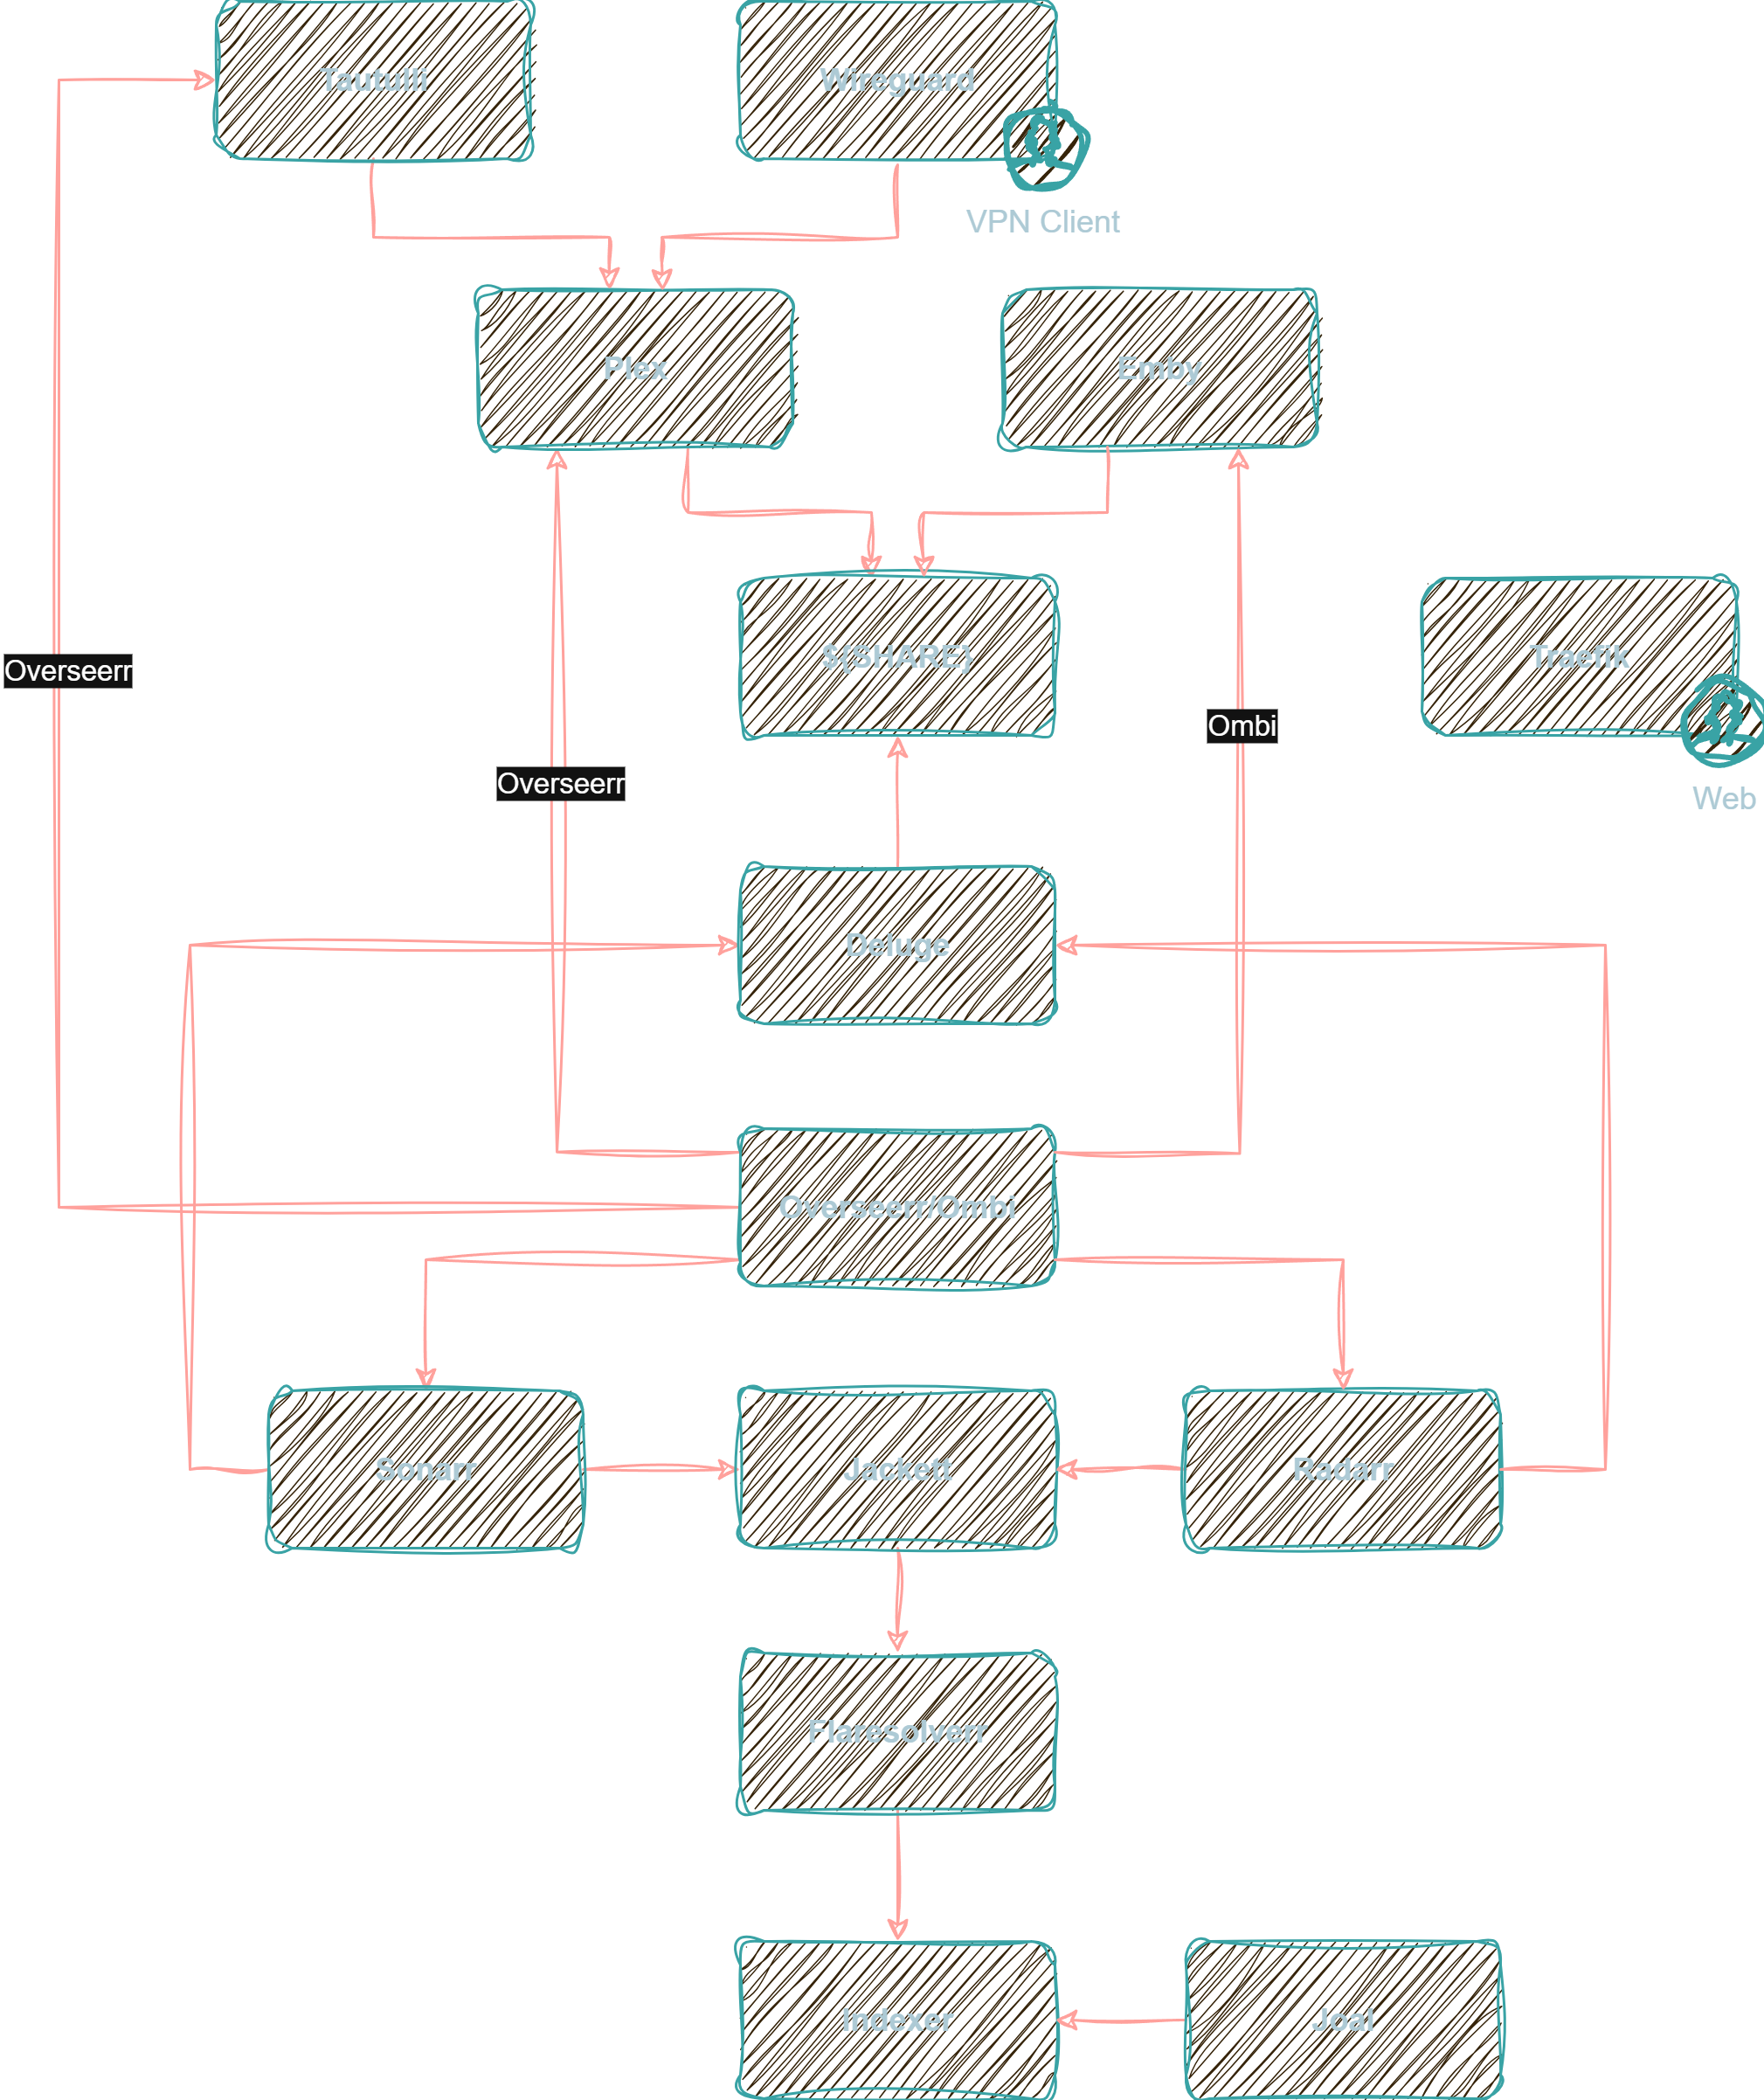
    You need to configure apps as follow :

    image

    Requirements

    • OS : Debian / Ubuntu
    • docker >= 24.04
    • docker compose plugin >= 2.19.1

    Wireguard

    You need to generate your password using this command :

    docker run -it ghcr.io/wg-easy/wg-easy wgpw CHANGEME

    Get the output without the single quotes, double every $, and then copy/paste to .env file at ${WIREGUARD_HASHED_PASSWORD}.

    Configuration

    Edit .env file, to set ${ROOT} folder, ${SHARE} directory, your domain name and plex hostname/token.

    Apps config are in $(ROOT}/config/${APPS}

    Start

    cd ${ROOT}
    docker compose up -d

    Stop

    docker compose down

    Tips

    SSH Tunnels

    To access to a local service (which is not publish front of server)

    ssh -p ${PORT} -L ${LOCAL_PORT}:${DOCKER_IP}:${REMOTE_PORT} ${USERNAME}@${DOMAIN}

    Example :

    ssh -p 18956 -L 19999:10.0.0.16:19999 user@mydomain.tld
    # enter your password

    Go to your favorite browser and http://127.0.0.1:19999

    Wireguard

    You can use WireGuard instead of SSH tunnels. To do this, you need to set WG_ALLOWED_IPS=10.0.0.0/24 in docker-compose.yml

    However, the goal of using WireGuard here is to bypass the Plex Remote Watch Pass and use Plex for free.

    By default, WG_ALLOWED_IPS is set to include only the Plex server.

    Visit original content creator repository https://github.com/z0rr0Day/MyBeautifulSeedbox
  • Process-Simulator-2-OpenSource

    Process Simulator 2

    You can download the full latest version of Process Simulator 2 from this link (install exe, dropbox): Process Simulator 2.8.6743

    This repository contains only a part of the open source code as an example to learn how to develop your own plugins.

    Connections

    • Internal – communication between objects inside application.
    • ModbusN – modbus master for Ethernet and Serial port. Uses NModbus library (https://github.com/NModbus/NModbus).
    • MQTT – MQTT client. Uses M2Mqtt library (https://m2mqtt.wordpress.com/).
    • OPC UA – OPC UA client.
    • S7IsoTCP – communication with Siemens SIMATIC PLC S7-300/400 and S7-1200/1500. Uses Snap7 library (http://snap7.sourceforge.net).
    • S7PLCSim – communication with Siemens SIMATIC S7PLCSim V5.4.
    • S7PLCSimAdv2 – communication with Siemens SIMATIC S7PLCSim Advanced v2.

    Converters

    • Compare – compare value with configured one.
    • FilterExp – exponential filter.
    • Inverse – invert value of Boolean type or array of this type.
    • Round – round numeric value or all values in array.
    • Scale – scale value using configured ranges.
    • ToBoolean – convert two values (true/false) to Boolean value and backward.
    • ToString – convert any value to string and backward.

    Simulation objects

    • Animation.ImageMove – move and rotate image.
    • Binary.Counter – count positive and negative front of Boolean value.
    • Binary.Delay – delay positive and negative front of Boolean value.
    • Binary.Logic – logical operations: AND, OR, XOR, NOT, NAND, NOR, NXOR.
    • Binary.Trigger – trigger logic.
    • Item.ArraySplitter – split Item with array to different Items by index.
    • Item.BitSplitter – split bits of Item to different Items by index.
    • Item.Delay – copy one Item value to another on command with adjustable delay.
    • Item.TimeLine – write values to Items at intervals.
    • Item.WriteToFile – write values to CSV file.
    • Pipeline.Pump – pump simulation.
    • Pipeline.Valve – valve actuator simulation.
    • Real.Calculator – arithmetic operations: Add, Subtract, Multiply, Divide, Modulo, Power, Logarithm, Logarithm (natural), Logarithm (base 10), Exponent, Square root, Sine, Cosine, Tangent, Absolute, Round, Truncate.
    • Real.Comparator – comparison of two values.
    • Real.Generator – signal generation: Sine, Square, Sawtooth, Random.
    • Real.Lag – first order lag.
    • Real.OneOfTwo – one value from two by boolean switch.
    • Real.Scale – scale value using configured ranges.
    • Real.XYDependency – define function Y=F(X) as array of points.
    • Robot.Conveyor – conveyor simulation.
    • Robot.SixAxis – six-axis robot simulation. Can be connected to RoKiSim 1.7 for visualization (http://www.parallemic.org/RoKiSim.html).
    • Script.CSharp – simple script in C# language.
    • Script.CSharpFSM – Finite-state machine in C# language.
    • Sensor.Analog – display and change analog signal with scaling and thresholds.
    • Sensor.Discrete – display and change discrete signal.
    • Voice.Command – recognize predefined phrase and write corresponding value.

    Visit original content creator repository
    https://github.com/alexor81/Process-Simulator-2-OpenSource

  • d3d10-mmxlc

    Mega Man X Legacy Collection d3d10.dll wrapper mod

    Features:

    • Let you use slang-shaders with Capcom’s Mega Man X Legacy Collection.
    • Fixes scaling artifact due to nearest-neighbour upscaling.

    Download from here.

    Building from source

    Using i686-w64-mingw32-gcc (cross compiling should work too):

    # Download source
    git clone https://github.com/xzn/d3d10-mmxlc.git
    cd d3d10-mmxlc
    git submodule update --init --recursive
    
    # Create symlinks and patch files
    make prep
    
    # Build the dll
    make -j$(nproc) dll

    Some options to pass to make

    # disable optimizations and prevents stripping
    make o3=0 dll
    
    # disable lto (keep -O3)
    make lto=0 dll

    Install

    Copy dinput8.dll, interp-mod.ini, and the slang-shaders\ directory to your game folders, e.g.:

    • SteamLibrary\steamapps\common\Mega Man X Legacy Collection
    • SteamLibrary\steamapps\common\Mega Man X Legacy Collection 2

    Configuration

    interp-mod.ini contains options to configure the mod.

    ; Log API calls to interp-mod.log,
    ; [logging]
    ; enabled=true
    ; hotkey_toggle=VK_CONTROL+O
    ; hotkey_frame=VK_CONTROL+P
    
    ; Change interpolation mode and set up custom slang shaders.
    [graphics]
    ; Use linear instead of point upscaling for the 2D games.
    interp=true
    ; (WIP) Use linear scaling when possible for the 3D games.
    ; linear=true
    ; When using Type 1 filter, interp=true, and slang_shader* is not set,
    ; apply Type 1 filter over and over until it reaches screen size.
    ; enhanced=true
    ; Custom shader for X1~X6, needs Type 1 filter set in-game.
    ; slang_shader=slang-shaders/xbrz/xbr-lv2.slangp
    slang_shader_snes=slang-shaders/crt/crt-lottes-fast.slangp
    slang_shader_psone=slang-shaders/xbrz/xbrz-freescale-multipass.slangp
    ; Custom shader for X7~X8.
    slang_shader_3d=slang-shaders/anti-aliasing/smaa.slangp
    ; (TODO) Custom render resolution for X7~X8
    ; render_3d_width=
    ; render_3d_height=
    ; Custom display resolution, e.g. 4K and so-on,
    ; Should be 16:9 as the mod currently does not correct for aspect ratio.
    display_width=
    display_height=

    If all goes well you should now be able to start the game and see the overlay on top-left of the screen showing the status of the mod.

    interp-mod.ini can be edited and have its options applied while the game is running.

    License

    Source code for this mod, without its dependencies, is available under MIT. Dependencies such as RetroArch are released under GPL.

    • RetroArch is needed only for slang_shader support.
    • SPIRV-Cross and glslang are used for slang_shader support.
    • HLSLcc is used for debugging.

    Other dependencies are more or less required:

    • minhook is used for intercepting calls to d3d10.dll.
    • imgui is used for overlay display.
    • smhasher is technically optional. Currently used for identifying the built-in Type 1 filter shader.

    Visit original content creator repository
    https://github.com/xzn/d3d10-mmxlc

  • bid19_hands_on_lab_ansible

    BID Workshop Ansible Repository

    For the BID Workshop the diggr team prepared a 2.5h introductory workshop
    for librarians about reasearch data management in a digital humanities
    research group. As the scientific libraries face new challenges in the
    21st century, as they are transforming from “just being libraries” to
    service centers of the digital age. To emporer the staff, we give insight
    in our reasearch process, to help form a better understanding of our
    work.

    Prequisites

    As this is an ansible playbook, it is best to run it against a freshly
    installed Linux Mint 19.1.

    I wanted to use Ubuntu 18.04LTS or 18.10 as a host system, but unfortunately,
    the laptops I had to use, were to new, and the chipset not supported by
    the kernel in 18.04 and crashed unreliable with 18.10. Even though Linux Mint
    19.1LTS is also using the older 4.15 Kernel (which didn’t even bother to boot
    when using the Ubuntu 18.04LTS version) it ran perfectly with Linux Mint.
    That is it why, I took the slightly obscure choice of using Linux Mint
    19.1LTS in this case here.

    Contents

    The ansible playbook contains various roles which set up a freshly installed
    Linux Mint 19.1LTS, to be used in the “practical reasearch data workshop” by
    the diggr team for the “BID Kongress 2019” in Leipzig.

    Installation

    It is expected, that you either have a spare host to set up the research
    environment, e.g. a virtual machine. Please install Linux Mint 19.1LTS

    Before you can run the ansible playbook, you have to install ansible. I use
    Ansible 2.5.7, but most other 2.x versions should work fine as well.

    Getting Started

    Boot up the computer an set up an openssh server. You can use the standard
    settings. Connect this host to a network, where you can access it over the
    network and put its ip address in the inventory file.

    Running the playbook

    Open a terminal on your computer, navigate to the directory, where this
    README file is located, and run the following command:

    $ make deploy
    

    which will run

    $ ansible-playbook -i inventory -l laptops diggr_bid_workshop.yml
    

    Youtube-API-Key

    In order to run PYG, you need to put your API Key in the config.yml file
    in the bid_raw_data directory in the bid users home dir.

    Copyright

    2019, Universitätsbibliothek Leipzig info@ub.uni-leipzig.de

    Author

    F. Rämisch raemisch@ub.uni-leipzig.de

    Visit original content creator repository
    https://github.com/diggr/bid19_hands_on_lab_ansible

  • ssh-cloud-backup

    SSH Cloud Backup (Alpine Docker Image)

    This docker image is intended for performing periodic backups via ssh. It consists of three main elements:

    1. Pre-configured cron (based on alpine-cron Docker image)

    2. Set of bash scripts to perform various kinds of backups

      • backup files/folders into an archive
      • backup files/folders without archiving (as is)
      • backup files by mask with/without archiving
      • backup Mongo databases
    3. Pre-installed rclone for saving backups to various cloud storage providers.

    This picture shows the main workflow of the implemented approach:

    Note: In order to use this Docker image, first of all, you need to configure ssh connection between backup host and all the source hosts. Second step is to configure at least one rclone “remote” to be used as cloud-storage. Last step is to configure cron to execute backups in a timely manner.

    Rclone Configuration

    Assuming you’ve already set up ssh connections, you can start using backup scripts. However, to let them upload backups to the cloud you need to configure rclone. Basically, it can be done by executing $ rclone config on backup host.

    After providing cloud storage credentials as well as other configuration details, the configuration file will be created at: /root/.config/rclone

    Note: Rclone’s “remote” name must be the same as specified in RCLONE_REMOTE_NAME environment variable (backup-remote by default).

    Supported Backup Scripts

    backup.sh

    Allows to perform the following actions:

    • backup the directory into an archive

    • backup the directory as is (without archiving)

    • backup files by mask with/without archiving

    Required arguments:

    • -s|--source-host – the source host to backup from

    • -i|--input-path – the input path to backup (source host)

    • -o|--output-path – the path where file/s should be saved (on backup host)

    • -r|--remote-path – the path on the cloud storage to store backups at

    Additional arguments:

    • -m|--mask – the backup file/s mask.

    • --keep-source-archive – if specified, the backup archive will be created at source host and won’t be deleted after downloading with scp. Default path where archives are kept is /tmp

    • --backup-files – the backup files mask. Used along with the argument -m|--mask

    • --pipe-source-archive – if specified, the backup archive will be created and downloaded without creating an archive on remote host (using pipes)

    • --backup-path-no-archived – if specified, no archiving will be performed, e.g. directory will be backed up as is(useful when the directory already contains some backup files that just need to be replicated to cloud storage)

    Examples of script usage:

    • backup the remote path, do not create the archive on remote host

      backup.sh -s <source-host> -i /opt/backup/squash-tm -o /root/.backup/squash-tm -r /squash-tm --pipe-source-archive

    • backup files using txt mask

      backup.sh -s <source-host> -i /opt/backup/squash-tm -o /tmp/backup-squash-tm -m .txt -r /squash-tm --backup-files

    • backup 1.txt file

      backup.sh -s <source-host> -i /opt/backup/squash-tm -o /tmp/backup-squash-tm -m 1.txt -r /squash-tm --backup-files

    • backup the path as is without creating its archive

      backup.sh -s <source-host> -i /opt/backup/squash-tm -o /tmp/backup-squash-tm -r /squash-tm/no-archived --backup-path-no-archived

    • backup the path, keep archive on the remote host after its download

      backup.sh -s <source-host> -i /opt/backup/squash-tm -o /tmp/backup-squash-tm -r /squash-tm --keep-source-archive

    backup_mongo.sh

    Creates a MongoDB dump.

    Required arguments:

    • -s|--source-host – the source host with MongoDB server running

    • -d – name of the database to backup

    • -o|--output-path – the local path to put MongoDB dump

    • -r|--remote-path – the path on the cloud storage to put MongoDB dump

    Examples of script usage:

    • backup Mongo database

      backup_mongo.sh -s your_mongo_server_domain_name -d admin -o /tmp/backup-mongo -r /mongo

    Periodic Scripts Execution

    Here’s an example of /etc/crontabs/root file which is used by cron to execute it’s jobs.

    Docker Store

    To pull the image from Docker Store:

    docker pull scalified/ssh-cloud-backup
    

    Supported environment variables

    • RCLONE_REMOTE_NAME – rclone remote name to be used for backups (default backup-remote)
    • BACKUP_SCRIPTS_DIR – the path where backup scrips are located (default /root/.scripts)
    • BACKUP_DIR – the path where backups are saved on backup host (/root/.backup)

    Supported build arguments

    • RCLONE_REMOTE_NAME, BACKUP_SCRIPTS_DIR, BACKUP_DIR
    • SSH_DIR – the directory where ssh keys will be placed, to be added as volume (default /root/.ssh)
    • RCLONE_URL – the url where rclone distributive is hosted (default https://downloads.rclone.org/rclone-current-linux-amd64.zip)
    • see Dockerfile for others

    Volumes

    • /root/.backup – the folder into wich the backup data is put, which will be synchronized by the rclone with a cloud storage
    • /root/.ssh – the ssh config folder
    • /root/.config/rclone – the rclone configuration path

    Scalified Links

    Visit original content creator repository https://github.com/Scalified/ssh-cloud-backup